Guide to Setup an OpenChannel SSD using QEMU
Table Of Contents
- Download Linux Kernel and Compile it
- Install and Setup QEMU
- Compile and Install NVMe CLI, liblightnvm and pblk-tools
This blog post describes the steps that I took to set up an environment with OpenChannel SSD using QEMU.
Download Linux Kernel and Compile it
The first step is to download the Linux kernel source from OpenChannelSSD’s GitHub repository. At the time of writing, features like pblk were not available on mainline Linux kernel. Compiling your own kernel might not be necessary in the future.
- Change to the directory where you want to clone the git repository. In this example I will use
/home/arpith/part/linux
$cd /home/arpith/part/linux- Clone the kernel:
At the time of writing this, latest kernel was available in thefor-nextbranch of https://github.com/OpenChannelSSD/linux
$git clone -b for-next [email protected]:OpenChannelSSD/linux.git- Copy the kernel config file from your existing system to the kernel tree:
$cp /boot/config-`uname -r` .config- Make sure that the .config file includes the following:
CONFIG_NVM=y
# Expose the /sys/module/lnvm/parameters/configure_debug interface
CONFIG_NVM_DEBUG=y
# Target support (required to expose the open-channel SSD as a block device)
CONFIG_NVM_PBLK=y
# For NVMe support
CONFIG_BLK_DEV_NVME=y- Bring the config file up to date. Answer any questions that get prompted. Unless you know you are interested in a particular feature, accepting the default option by pressing Enter should be a safe choice:
$make oldconfig- Clean the kernel source directory:
$make clean- Build the linux-image and linux-header .deb files using a thread per core + 1.
$make -j `getconf _NPROCESSORS_ONLN` deb-pkg LOCALVERSION=-customThis creates .deb files which is used to install the kernel in QEMU.
Install and Setup QEMU
In case you don’t have a physical OpenChannel SSD in hand, you may use Keith Busch’s QEMU branch to emulate the device via a backend file.
- Create an empty file to hold your NVMe device.
$dd if=/dev/zero of=blknvme bs=1M count=1024- Clone, compile and install QEMU
You might need to install the following depencencies.
sudo apt install libpixman-1-dev libaio-dev libspice-server-dev libspice-protocol-dev libattr1-dev libcap-dev
$git clone [email protected]:OpenChannelSSD/qemu-nvme.git
$./configure --python=/usr/bin/python2 --enable-kvm \
--target-list=x86_64-softmmu --enable-linux-aio \
--prefix=$HOME/qemu-nvme --enable-virtfs --disable-werror --enable-spice
$make -j8
$make install
$cd $HOME/qemu-nvme/bin- Download Ubuntu and install it in QEMU. Start by creating a disk image and booting Ubuntu from an ISO.
$qemu-img create ubuntu.img 30G
$qemu-system-x86_64 -hda ./ubuntu.img -boot d \
-cdrom ./ubuntu-17.04-beta2-desktop-amd64.iso --enable-kvm -m 16G -smp 12
For more information on what the parameters do, visit smdaudhilbe.wordpress.com
-
Follow the on-screen instructions to install Ubuntu
-
After installation, start the VM with the following parameters. You may notice that I am using spice.
$qemu-system-x86_64 -hda ./ubuntu.img --enable-kvm -m 16G -smp 12 \
-virtfs local,path=/home/arpith/part,mount_tag=host0,security_model=none,id=host0 \
-drive file=./blknvme,if=none,id=mynvme \
-device nvme,drive=mynvme,serial=deadbeef,namespaces=1,lver=1,lmetasize=16,ll2pmode=0,nlbaf=5,lba_index=3,mdts=10,\
lnum_lun=8,lnum_pln=1,lsec_size=4096,lsecs_per_pg=4,lpgs_per_blk=512,ldebug=0,lstrict=1 \
-vga qxl -spice port=5930,disable-ticketing \
-net user,hostfwd=tcp::7777-:22 -net nic
$spicy -h 127.0.0.1 -p 5930 #Connect to the guest using SPICE client- You may have noticed that I am trying to share host’s
/home/arpith/partto the guest.
Once the VM boots up, mount that folder in the guest. To do so, run the following command in the guest.
$mount -t 9p -o trans=virtio host0 /home/arpith/part -oversion=9p2000.L- Remember the Kernel we compiled earlier? Install it.
$cd /home/arpith/part/linux #Note that these commands are run in the guest OS
$sudo dpkg -i linux*4.11.0*.deb
Alternatively, you may use -kernel option to load the kernel as described here, but I had some issues with networking and mouse pointer (which disappeared!). Hence the need for this workaround. (The issue is that the kernel does not load modules correctly when using the -kernel option. Not sure what is the cause of this issue. Maybe I’ll look into this later when I have time. A quick solution is to change certain parameters in .config from =m to =y. The driver is now built into the kernel.)
- Reboot the virtual machine. Ensure that it is running the kernel that you compiled with
uname -a.
Compile and Install NVMe CLI, liblightnvm and pblk-tools
- Install Nvme CLI
$git clone [email protected]:linux-nvme/nvme-cli.git
$cd ./nvme-cli
$make
$sudo make install- Install liblightnvm
$git clone [email protected]:OpenChannelSSD/liblightnvm.git
$cd ./liblightnvm
$make
$sudo make install- Install pblk-tools
$git clone [email protected]:OpenChannelSSD/pblk-tools.git
$sudo apt install libudev1 libudev-dev libz-dev
$cd ./pblk-tools
$make
$sudo make install- If everything went according to plan, run the following command and check if a virtual disk is detected.
$sudo nvme lnvm list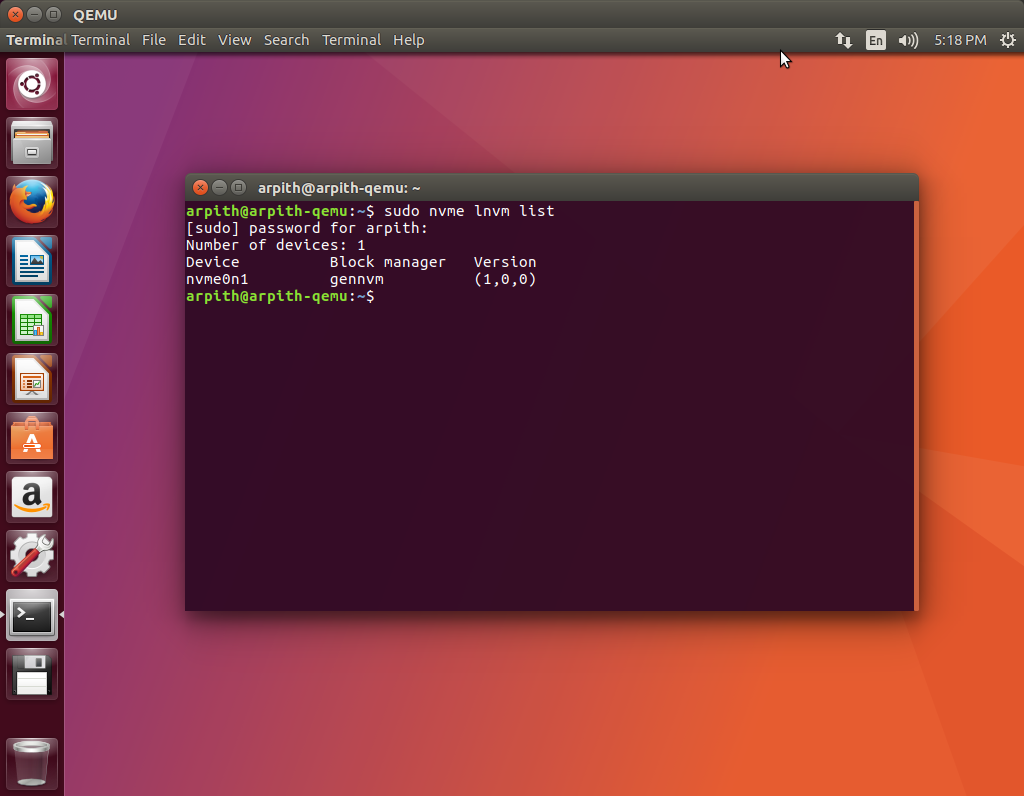
References
- http://lightnvm.io/
- https://wiki.archlinux.org/index.php/QEMU#qxl
- https://smdaudhilbe.wordpress.com/2013/04/11/how-to-install-ubuntu-inside-qemu-emulator-and-make-a-virtual-machine/
- https://wiki.ubuntu.com/Kernel/BuildYourOwnKernel
- https://wiki.ubuntu.com/KernelTeam/GitKernelBuild
- https://superuser.com/questions/628169/how-to-share-a-directory-with-the-host-without-networking-in-qemu