Getting Started with PintOS
This guide walks you through a series of steps to get you started working on PintOS.
Pintos is a simple operating system framework that supports very basic features. The objective is to strengthen the functionality of this OS. This involves working on various aspects of an operating system including:
Table Of Contents
Installing PintOS
Prerequisites
Before starting, you’ll need to install the following dependencies
- Linux OS (At the time of writing, I was using Ubuntu 15.10)
- qemu (Emulator)
- GNU make
- GNU binutils
- perl
- gdb
sudo apt-get install qemu make binutils perl gdb
Obtaining the Source Code
Head over to the Stanford’s site or click the link below to download the tar.gz file containing the PintOS source:
http://www.stanford.edu/class/cs140/projects/pintos/pintos.tar.gz (mirror)
Extract the contents to the directory of your choice. For the purpose of this post, I will assume that the contents were extracted to the $HOME directory.
Setting the PATH Variables
The project requires you to run scripts present in /src/utils folder. Working on this project would be easier if you have this directory your in $PATH.
The easiest way to add /src/utils is as follows:
- Open terminal
- Add the line PATH=”$PATH:$HOME/pintos/src/utils” to .profile or .bashrc
$ echo PATH="$PATH:$HOME/pintos/src/utils" >> ~/.bashrc - Reload your shell
$ source ~/.bashrc - To verify that the environment has been set correctly, run the following command
$ pintos
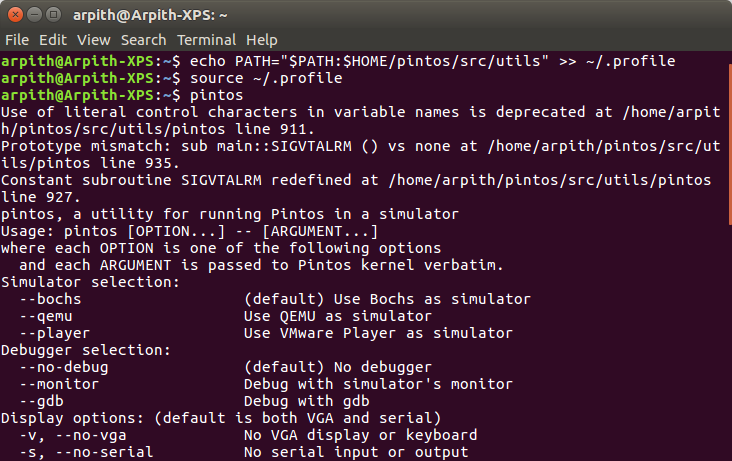
If you get the above output, congratulations! You just took your first baby step! :)
Compiling the Source
- Head over to src/threads directory
$ cd pintos/src/threads - Set the simulator to
qemuin Make.vars file
SIMULATOR = --qemu - Compile the source with the make command
$ make - Run a program called ‘alarm-single’ in PintOS with QEMU
$ pintos --qemu -- -q run alarm-single
Troubleshooting
-
At this point you might get an error which says:
Can’t exec “qemu”: No such file or directory at /home/arpith/pintos/src/utils/pintos line 923.
In this case, open thepintosperl script insrc/utils/and replace line 623 (my (@cmd) = ('qemu');) withmy (@cmd) = ('qemu-system-i386'); -
Ideally, the QEMU should exit once PintOS powers off.
If it does not and gets stuck atPowering off..., then it means that there is something wrong with ACPI poweroff routine.
To rectify the issue, open the filesrc/devices/shutdown.c
Now, Insert the lineoutw( 0x604, 0x0 | 0x2000 );afterprintf ("Powering off...\n"); serial_flush ();as shown below:
  printf ("Powering off...\n");
  serial_flush ();

  //add the following line
  ++ outw( 0x604, 0x0 | 0x2000 );

  /* This is a special power-off sequence supported by Bochs and
     QEMU, but not by physical hardware. */
  for (p = s; *p != '\0'; p++)
    outb (0x8900, *p);
After you make the above changes, recompile with the make command and rerun alarm-single program in PintOS.
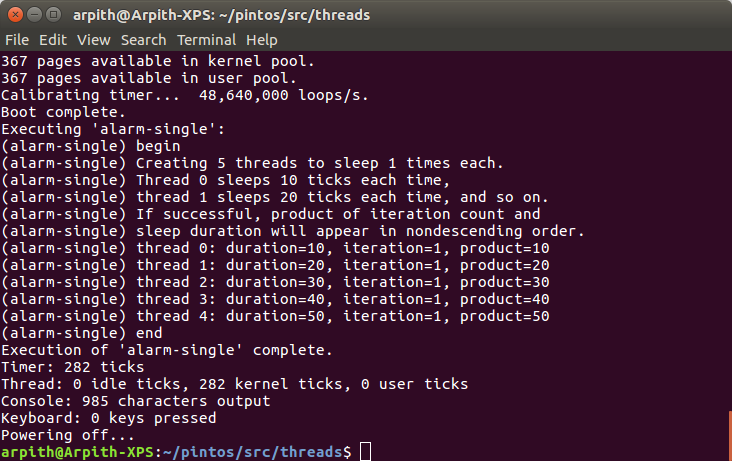
Congratulations! You should now have a program running in PintOS!
Testing
The source comes with predefined test cases which you would use through the course of this project to verify your implementation.
After building the project, you’ll see that a new directory called build is created. Go to that directory and execute
$ make check
Assuming that this is the first time you’re running PintOS and have not modified the original source code, most of the test cases would fail. For the first project, you’d have to implement alarm clock, priority scheduling and advanced scheduler. Once you have correctly implemented this, all test cases should pass.
Good Luck!
Using Eclipse
While one could use Vim to edit your code and use ctags + cscope to navigate between them, I find working with Eclipse much easier.
To import the source code,
- Download Eclipse for C/C++
- goto
file -> import -> C/C++ - Select Existing Code as MakeFile Project
- Click next
- Name your project
batman:P - Set the src folder of PintOS as the Existing Code Location
- Use Linux GCC as the toolchain from indexer settings
- Done!
You should now be able to see all directories in the Project Explorer.
Some of the most commonly used shortcuts are
- F3 - To view the declaration of the selected function
- Ctrl + Shift + G - To find references to selected function. I used this to locate the function calls to a particular function
I used eclipse only as an editor. To build the project, the terminal was my friend.
Note: There are many ways to set up your working environment. One could use Vim while the other may prefer Gedit (o.O). Feel free to explore and learn.
Epilogue
Be sure to read the documentation provided by Stanford carefully.
Understand what you need to do and observe what the original source code already does. Spend some time designing the solution on a piece of paper before actually implementing it. This could potentially save a lot of time at a later stage.
All the best! See you on the other side :P